

Sew Along with ALD -- Meyraki Taylor Tee!
- Jan Allison

- Sep 21, 2019
- 6 min read
Updated: Sep 28, 2019

Hello, all! I'm Jan, and I usually blog at Rolling Stop Creations. This month I'm here on the Amelia Lane blog to host the September Sew Along!
For September, we’ll be sewing the Meyraki (formerly Pickle Toes Patterns) Taylor Tee! The Taylor Tee comes in baby, kids and kids plus, women’s and men’s sizing, so you can make one for the whole family. These patterns are loaded with fun options including hoods, thumbhole cuffs, and cool color blocking.
Come join us on Facebook in the Amelia Lane Designs Facebook Group to find the event. Join the Sew Along with ALD - Meyraki Taylor Tee event to find all the dates and details, including some awesome discounts! Remember, you’ll need to post in the event with your daily entries to enter to win the grand prize.
The fun starts Monday, September 23, so get ready for the fun!
For this sew along our schedule will go as follows:
Day 1: Print your pattern and make any adjustments you need. Pick your fabric and thread.
Day 2: Cut your fabric.
Day 3: Sew colorblocked front and shoulder seams.
Day 4: Sleeves and side seams
Day 5: Hood or neckband
Day 6: Hem and Catch Up Day! (With a chance for a bonus entry!)
Day 7: Share your makes!

Happy Monday! Today, we'll be doing the basic pattern assembly and making decisions on fabric.

Most Meyraki patterns do include layers, so check the size chart and choose the sizes you need. You can check the boxes of only those sizes you need and eliminate a lot of the “line soup” on the pattern. To choose your size, most of these patterns go by chest measurement. The women’s pattern does include bust/waist/hip measurements on the chart for easier grading between sizes. Before you hit “Print,” double check that your printer is set to print at Actual Size or 100% Scaling. I usually print the first page and double check the test square to make sure it’s printing correctly before I print the entire pattern.

Meyraki patterns are no trim, so when you print, you’ll see arrows on the edges of pages. You’ll want these arrows to actually overlap. There are a lot of ways to make this work. You can use a light box or a large window to help see through the pages. Others use a hole punch to give a little window to the page beneath. Whatever works best for you is awesome. Tape or glue are the most popular ways to attach the pages.

Once your pattern is assembled, cut the pieces out. Make any personal adjustments to the pattern that you need for your best fit.
When that is all squared away, I like to use a paper bag to keep all the pattern pieces and supplies in one spot for each project. It keeps me at least a little organized, and I find it's easier to put everything away at the end of the project if it's all in the same place.

Choose your fabric (ALWAYS prewash!), and make sure you have all the supplies you’ll need to sew. I also suggest if you’re using a fabric with less stability and recovery such as rayon spandex, sweater knits, hacci, waffle knits, etc., you pick up some ¼” clear elastic. I’ll show you how to use it to keep these fabrics from growing with wear.
That's it for Day One! If you run into any troubles, feel free to tag me in the Facebook Event. (Make sure you're a member of the Amelia Lane Designs - Fabric Chat group.) Be sure to post your day's progress on the Day One Post in the event to enter to win!

Welcome to Day 2! Yesterday we got everything ready to go for today's task, so this one should be pretty quick and easy.

Today we are going to cut our fabric out! I suggest going back to the pattern and double checking that you’ve got the pattern pieces you need for your chosen options. If you’re doing the colorblocked front, make sure you’ve got all the pieces you’ll need. I like to do all my cutting at once, because it’s one of my least favorite sewing “chores.”

Make sure that as you lay out your pieces to cut, that you have the stretch markings following the direction of stretch in your fabric! This is very important so that your piece fits as intended and doesn’t “twist” on your body as you wear it. It's easy to lay your pattern pieces out to maximize your fabric but forget to make sure the end result is lined up with the grainline and stretch of the fabric.

Watch for spots on the pattern where you need to make notches or marks. I like to make these extra obvious to myself so I don't forget them.
That's all for day 2! Get all your pieces cut out and set aside and we will see you tomorrow.

We're on to day 3! Today, we’re going to tackle the color blocked front of the Taylor Tee. If you’re not interested in that, go ahead and scroll down a bit.


For the front, I found it helpful to lay my pieces out like a road map. I used my regular machine for piecing these so the seams could be pressed open to lie flat causing less bulk across the chest. If you prefer to use your serger, that works fine, too. Once all the pieces of the front are assembled, you can treat it as a single front and carry on as usual.

Now, take your front and back and pin at the shoulder seams. Stitch across the shoulder seams and you’re done for the day!

On one of my Taylor Tee’s, I used waffle knit. Waffle knit is so soft, I worried that the stress on the shoulder seams would cause the shirt to get bigger throughout the day. That’s where clear elastic comes in! Check out the event in the Facebook group and see the quick video I did showing just how easy it is to use for things like this.
Join us tomorrow, when I walk you through my favorite method for thumbhole cuffs!

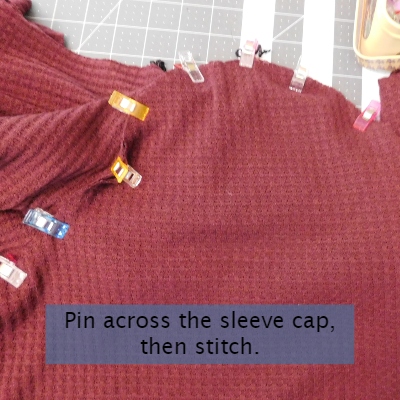
It's Day 4! Today we’re going to attach the sleeves to our Taylor tops! There are a few different ways to finish the sleeves included with this pattern. Shorter sleeves can be hemmed or banded. Long sleeves are hemmed or cuffed, with an optional thumbhole cuff.
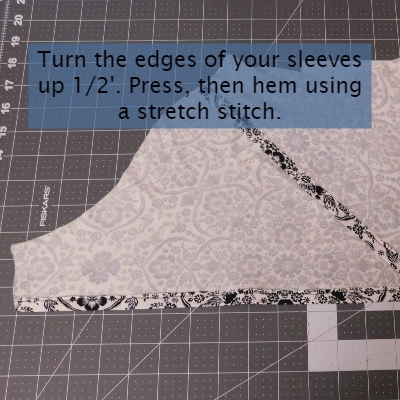
For my colorblocked top, I chose to use short, hemmed sleeves. I am a total rebel and hem my sleeves before attaching them, because my machine isn’t a huge fan of hemming in the round. If you choose, you can attach them first, then hem. For sleeves that aren’t hemmed, go ahead and stitch the sleeves on.


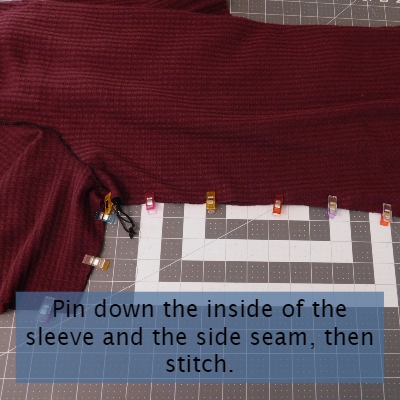


Once your sleeves are attached, go ahead and line up the side seams. Stitch the side seams on both sides. To finish the sleeves, add your bands or cuffs. For the thumbhole cuffs, there are several different ways to go about them. I’ll walk you thru the assembly steps I used for mine in the Facebook group event!
Tomorrow, we’ll attach our hoods or neck bands! See you Friday!

We're in the Day 5 homestretch! Today we’ll be attaching the hood or neckband to your top. If you’re attaching a neckband, create the band. Quarter your band and your neck opening. Stitch the band to the neck, stretching only the band slightly to get it to fit the neck.

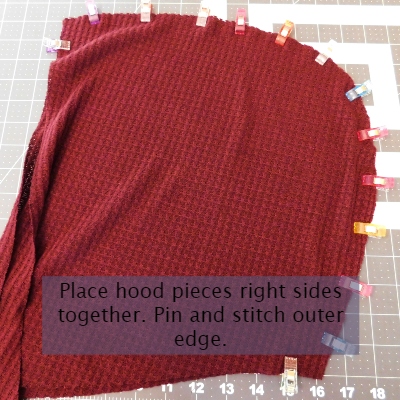

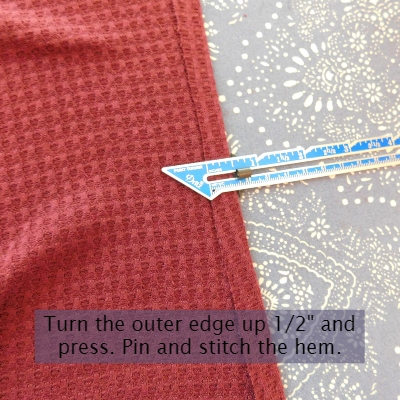

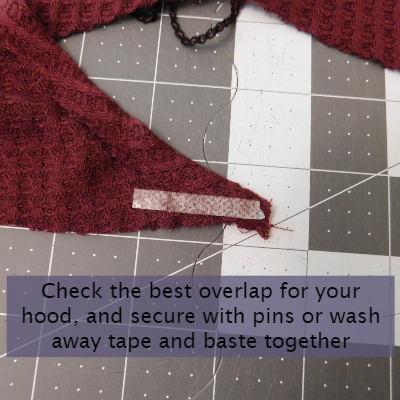

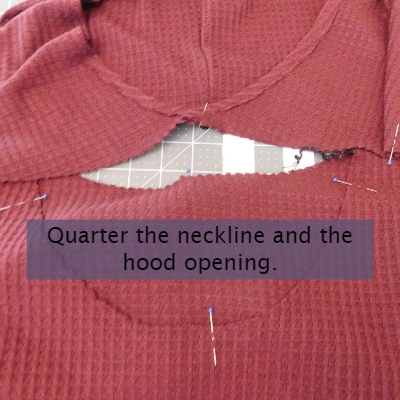

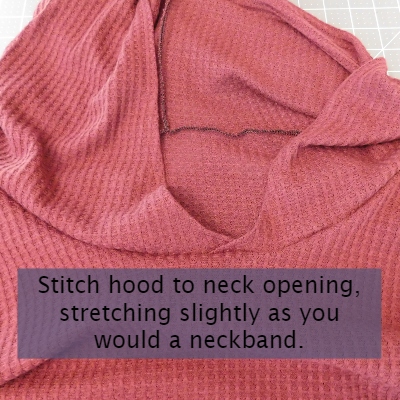
For the hood, there are two options. You can do a lined hood or an unlined hood. I’m going to the unlined hood for my version. Take your hood pieces and place them right sides together. Stitch around the outside of the hood. Press the outer edge up ½” and stitch the hem in place. Before attaching the hood, be sure to cross over the front pieces a bit to make the hood fit like a neckband. I used wash away tape to fit test my hood and found that 2” worked really well. You can check fit and see what overlap works best for your size. Once you’ve got it where you want it, stitch it on, treating it like a band.
Once your neck opening is completed, we’re done for the day! One more day, and we’ll finish up tomorrow!

Ok! It's Day 6! Today is your day to sew and catch up with the SAL for the week. Be sure to post your pics as you go on each day's post in the main group to be entered to win!
Once you've caught up to us on Day 5, all you have left to do is hem, so we'll be doing that today. This one is a super easy hem, and even though it's my LEAST FAVORITE thing to do in sewing (I'll take a zipper over a hem any day), this one was quick and painless. Check your pattern to see how much to fold up, press and pin, then stitch! You're done!!
Now, we've got one more thing to talk about.....a bonus entry!! Come join us in the Facebook event for this sew along, and I'll share one of my favorite parts of this pattern, how I made it fit perfectly, and how YOU can get an extra entry to win the SAL prize!


Comments