


Sew Along with ALD: Rain City Patterns Pearson Pullover
- Laura Frost

- Feb 22, 2021
- 10 min read

I'm all about sleeves lately. It seems like a big sleeve can really make my day and they're surprisingly easy!
I'm Laura and I usually blog at kittymakesit.com but this week I'm hosting a sewalong here at Amelia Lane Designs for my new favorite pattern, the Pearson Pullover from Rain City Patterns. The pattern comes in adult (contour) and kid's sizes and the size chart is inclusive.
It's a raglan style top so it's a quick sew in all the views. They all have a fun bishop sleeve with a cuff or elastic finish. There's a neckband or hood, optional kangaroo pocket and option to finish the bottom with a band or elastic.
(Photo: Neckband, sleeve cuff and waistband view in Zari DBP fabric - I made the waistband double the intended height)

Thanks for joining me!
Here is our schedule for the week:
DAILY SCHEDULE
Day 1 (2/22): Pattern or Projector Prep
Day 2 (2/23): Cut Fabric
Day 3 (2/24): Shoulder Seams and Side Seams
Day 4 (2/25): Hood or neckband
Day 5 (2/5): Cuffs & Waistband or elastic
Day 6 (2/6): Catch Up
Day 7 (2/7): Share!
Let's Get Started!
Day 1: Pattern Prep

Welcome to Day 1 of Pearson Pullover #SALwithALD. Today is all about getting ready. Measure the person you're sewing for to determine what size(s) you will need to print or project. If they fall between sizes you may want to consider sizing down or ideally, grading between sizes. You should also adjust for their height if needed. The tutorial also has instructions and measurements in case a full bust adjustment is needed.
Once you have your size(s) picked out and know what options you want to sew: open the pattern in Adobe Reader and turn off the size layers that you don't need. If printing there is a print guide in the tutorial so that you can print only the pages you needed. Make sure to print and check the test square first catch any print sizing errors right away. Assemble your pattern and grade if needed before cutting out your pattern. There are trim and no-trim page options available. I prefer to use the no-trim and assemble with tape or glue. If you're using the trim version you may have a favored method, but mine is to use a hole puncher to help line up the pages.
If you're using a projector you're good to go until tomorrow (but remember to double check your zoom and test square before cutting too). If you need to grade and are uncomfortable with doing that visually as you cut Inkscape is a free vector software that can be used to manipulate patterns. The group Projectors for Sewing is a great place to get help with the technical side of manipulating patterns for projecting and projectors themselves.
Don't forget to share your progress on the daily post!
Day 2: Cut Fabric

Welcome to Day 2! Today we will be cutting our fabric. Take note of the direction of stretch and grain line when laying out your fabric.
Fabric choice: Fabric choice is for sure going to affect how this looks. I used rib knit (chambray and montrose), honeycomb (copper), DBP (zari) and jersey moss (red-heathered) for the Pullovers I made for this sewalong. Each drapes a bit differently and that will affect how it looks. If you have questions, post them in the facebook group and I'd love to talk about fabric with you!
Photo: Montrose rib knit laid out on my sewing table wrong side up with the right side folded over exactly the width of my front pattern piece so I can cut on fold with the selvage running down the pattern piece and greatest stretch going across.

If you are using paper patterns lay your pattern pieces down and cut out your fabric using your preferred method. (Mine is a rotary cutter)
Projector user make sure to double check your test squares before cutting!
Here's my cut out pattern pieces in montrose rib knit for the neckband and elastic finishes view (no waistband or cuffs to cut) - photos.

Don't forget to share your progress in the daily thread if you're sewing along! Everyday is a prize entry!
Day 3: Shoulder Seams and Side Seams

Welcome to day 3! Today is the first sewing day!
And my favorite aspect of raglans. A raglan was called a "baseball tee" back when I was starting to care about what I wore in high school. I always just thought that was any shirt that had different color sleeves but I've now come to understand it's about where the armcye is. My really elementary understanding and explanation since I'm not a designer or professional of any kind, is that raglans are when the top of the sleeve comes all the way up to the neckband causing a seam to run diagonally from armpit to neck. This is different that an inset sleeve that is a traditional tee shirt style with a curved seam running around the arm. There's also the dolman style like the Dream Tee where there's a seam at the top of the shoulder to connect front and back but no separate arm attachment.

Photo: wrong side of montrose rib knit fabric shows for seams done on a serger running from neckline to the eventual armpit. The four pieces come together to form an oval neck opening.
My point being - raglans are fun to sew because you get to do all four seams at once. You'll pin the front shoulders to the front of the sleeves and the back shoulders to the back of the sleeves all at once. As opposed to with an inset sleeve you have to sew the shoulders then pin the sleeves on. Less trips back and forth between pinning and sewing!
IF DOING THE KANGAROO POCKET PAUSE HERE
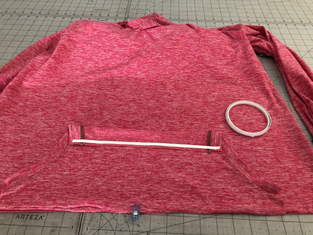
Then just hold the top up inside out and match up where the seams end under the sleeve and pin and sew the sideseams. Photo shows montrose rib knit inside out with top laid out with arms up (like it's riding a rollercoaster) with the side seams pinned all the way from the wrists of the sleeves down to the heminline of the top on both sides.

Pocket addendum. If you want a kangaroo pocket it would be easiest to do before you do the side seams.
Photo 1: I have pinned the pocket bands to the pocket openings (ignore the hood pieces, that's tomorrow's problem). I like to topstitch the pocket bands after I attach them.
Photo 2: I mark the front center bottom of both the top and the pocket and clip them together and keep them that way until I'm ready for the waistband or waist elastic.
Photo 3: I use wash away wonder tape to fold down the top of the pocket and again to stick the top of pocket to the front of the top. I do the same with the bottom sides of the pocket opening. Then I attach to the top front


Share your progress in the daily entry thread if you’re sewing along!
Day 4: Hood or neckband

Welcome to day 4 of Pearson Pullover sew along! Today we are going to finish the neckline.
There's two options or views included in the pattern. A standard neckband or a hood.

For the neckband, it's pretty standard. Photo shows montrose rib knit top, right side out assembled but not finished at neck, sleeves or bottom. Neckband has already been sewn into a loop by sewing the short ends right sides together. Neckband has been folded in half with right sides out to enclose that seam and is laid out above the unfinished neck opening of the top. The center back of the top's neckline has a pin holding a strip of fabric that I use like a tag so I can find the back when I'm getting dressed.

Photo: Neckband pinned to neck opening on montrose rib knit fabric
The next step is to quarter and pin the neckband. Let me describe my preferred method -
I like to match the back center of the neckline and the center of the neckband where the seam from sewing the band into a loop is enclosed. Then I hold the top up and let the neckline hang down evenly to find the center front and I pull the neckband down also finding the center front of that piece. I match those two. So I have center front and center back matched up evenly. From there I hold the neckline so the two pins I have in are touching and find the halfway point on each side. This causes me to have evenly stretched to "quarter" the neckband. Then I stretch between each set of pins to find another halfway point until I have 8 evenly spaced pins. That may be more than you need if you're really good at neckbands or if you're sewing a smaller size than I am.
I like to top stitch the seam allowance down so the neckband will lay flatter.
For the hood option there's a couple extra steps:
First pin and sew the right sides of each hood mirror imaged set together around the top curve from forehead to back neckline. (Photo is of pinned hood pieces - 2 mirrored sets. also shows pocket bands - disregard those since we did that already)

Then moosh (that's a very technical term of course) right sides of the hood together at the hood opening, pin and sew. One way to do this: grab one hood piece from where you sewed the two mirror images together and lay it open, right side up on your sewing table. Take the other piece and spread it open, laying it on top, right side down against the other right side and match up the center front seams. Then pin around the hood's opening to connect the two pieces. This is the finish for the front of the hood at the hairline.

Photo shows two hood pieces right sides together pinned and ready to be sewn.
When you turn those pieces right side out after sewing you'll have a long straight, unfinished edge along the bottom. This is what you attach to the neckline in lieu of a neckband.
I like to start by overlapping the tapered ends and pinning to form a loop. That way I can quarter and eighth the openings like I do for a neckband. I don't use a tag with a hood since I'll be able to tell which side the back is. Hoods aren't top stitched because they stand up and lay down depending on how you're wearing it.

Photo shows hood pinned to unfinished neckline of top.

Photo shows me wearing the top with my hood up. Fabric is red-heathered jersey moss, a really soft and light fabric from the athletic collection. Finished with cuffs, waistband and kangaroo pocket.
Don’t forget to share your progress in the daily thread to get your entry in!
Day 5: Cuffs & Waistband or elastic

Day 5 is busy. Well for me at least since I'm going to show all the options but you only need to choose two of the four (per top you're making!)
I'll start with the elastic options. You can finish your waistband and wrists with elastic. The size and length are in the tutorial. For length I would echo the tutorial that you should measure what's going to be comfortable. I actually like my waist elastic a little loose and my wrist elastic super tight.

Photo shows sleeve folded up at wrist opening (like you would if you were going to hem it with a really wide hem) and pinned
Let's do wrists first. The wrists are finished with an elastic casing. Fold your fabric over per the tutorial and stitch leaving an opening. I like to use my cover stitch for this. I also like to leave a much smaller opening than the tutorial calls for, but that's because ... shhhh.... sometimes I'm lazy and don't actually close it up. It's a knit so it won't fray and you'll never notice it because there'll be plenty of gathering to hide it!

Photo shows me cover stitching my folded over sleeve/wrist with two needles, using montrose rib knit fabric. I have stopped just before getting back around to where I started and will end here to leave an opening.
Then thread your elastic through the opening. I use a bodkin for this. (a safety pin would work, I just don't have anything sharp in my house because my cats are jerks)

Photo shows me using a bodkin to lead one end of elastic into the opening I left.
Hold on to the other end! Then overlap the ends and sew into a loop and tuck into the casing you made. Close the casing.

Photo shows elastic inside casing with just the two ends sticking out, overlapped and pinned
The bottom hem can be finished the same way. The tutorial uses a different method, but I deviated a bit and finished the bottom the same way as the sleeves because I like to pull more gathers forward to my front and adjust for the most flattering look.
But the tutorial method is easier, honestly. Start by sewing the waist elastic into a loop first. Then quarter it like you would a neckband and sew it to the waist opening. Then flip it under and top stitch. It will be equally stretched and lay flatter.
Now if you chose cuffs (I can't decide which I like better!) start by running a gathering stitch around the wrist opening of the sleeve and pulling the thread to gather.

Photo shows using a regular sewing machine to run a gathering stitch (light tension, longest stitch length) around the wrist opening of the sleeve. I'm holding the ends of the thread and have pulled them to cause the sleeve opening to shrivel to a very small opening.
Sew the cuff pieces into loops right sides together.

Photo shows two cuff pieces wrong sides out, pinned at the long ends.
Then fold the cuff over so the right sides are out and the seam you just made is enclosed. Slip this over the gathered wrist opening so the unfinished edges are together. Adjust the amount of gathering tightness so the openings match and sew. Then remove any visible gathering stitches left.

Photo show sleeve cuff pinned to gathered sleeve opening using copper honeycomb fabric.
For this particular make I didn't use waistband because I decided to extend to dress length and hem. I just left the waistband off and added length straight down to the length I wanted my dress plus hem allowance. You could also lay your favorite dress pattern on top.

Photo shows Copper honeycomb dress length Pearson with cuffed sleeves and neckband
For the waistband there are two pattern pieces. I used the tapered waistband and even decided to shorten it a bit because I wanted a snug fit. Sew the waistband into a loop, quarter and attach unfinished edges of waistband to unfinished bottom of the top and sew. I don't topstitch waistbands.

Photo shows waistband pinned to bottom of the Pearson Pullover.
Share your progress on today's daily post! Share your finished make on Sunday on the Day 7 "Share" thread or to the wall, but make sure to use the #SALwithALD so I can find it and give you an entry for prizes!
I think I managed to cover all the options, here's my finished Pearsons!


Thanks for sewing along with me! See you next time!


Comments