

Bella Sunshine Designs Amelia Top & Dress Sew Along
- KLujan

- Mar 16, 2020
- 8 min read
Updated: Mar 20, 2020
Hello everyone! My name is Kelle and I usually blog at justewsomething.com, but this week I’ll be your host for the Bella Sunshine Designs Amelia Top and Dress Sew Along! The Amelia is one of my daughter’s favorite patterns. She requests at least one dress a year (the maxi length being her favorite) so I was excited to share this pattern with others. Plus, Amelia is available for kids or adults, which opens this sew along to a larger group of sewists.
You can follow along here on the blog as I update everyday and join us in the Facebook group. If you have any questions, please ask!
Our planned schedule is as follows:
Day 1: Assemble pattern and choose fabric.
Day 2: Cut fabric.
Day 3: Assemble bodice.
Day 4: Assemble and attach waistband.
Day 5: Assemble and attach skirt.
Day 6 and 7: Catch up and share.

Day 1: Today we will be assembling the pattern and choosing our fabric!
The Amelia includes a top, knee, or maxi length skirt. You may also choose sleeveless, short sleeves, 3/4 sleeves or long sleeves.
Measure yourself (or your intended recipient) and consult the size chart (pg. 8 for kids, pg. 9 for adult) to decide which layers to print. Be sure to print all the sizes you need! A bust adjustment piece is available in the adult pattern if you have a 3” difference between your overbust and full bust. Handy printing charts for sizes are included in patterns (pg. 3) so you don’t have to print all the pages.
Blending instructions if you fall in multiple size ranges are on pg. 7 for kids and pg. 8 for adults.
The printed pages need to be trimmed before assembly. Line up triangles on sides and bottoms and then tape or glue. Keep going until you are done!

Fabric suggestions for the bodice are knits with 50-75% stretch, some percentage of lycra/spandex, and 4-way stretch. Double brushed poly, cotton lycra, rayon spandex, and rib knits would all work great. The skirt portion can be made of woven or knit fabrics. The maxi length skirt does require a large fabric width so keep that in mind when choosing fabrics.
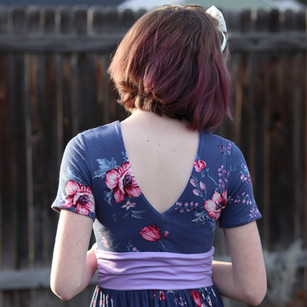
We used Nashville Rayon Spandex for our dress, which is probably a little lighter weight than the recommended fabrics. I did some extra stabilizing with clear elastic, and we used lilac double brushed poly for the lining to help stabilize the bodice.
Once you have chosen your fabric, be sure to prewash so it’s ready to go for tomorrow. And we are done with Day 1! Tomorrow we will be cutting the fabric. Be sure to take a picture of your progress and check in on the Facebook group post to have a chance to win a free pattern from Bella Sunshine Designs and free shipping on one fabric order from Amelia Lane Designs.

Day 2: Today we cut fabric! Don’t worry- this isn’t a super complicated pattern to cut, but I want to point out the grain line on the front bodice pieces especially. This is usually where I’ve seen people go wrong with this dress as the grain line is different than you might expect. Instead of putting the bottom of the bodice pieces along the grain line, you need to put the diagonal lines along the grain. Not following these little arrows can cause your fabric to stretch differently than the pattern intends and cause more gaping than you'd like!

According to the pattern pieces, we need to cut 2 bodice fronts, 2 bodice backs, 2 sleeves (if using), 2 main bodice bands, and 2 skirt pieces from the main fabric. We also need 2 bodice fronts, 2 bodice backs, and 2 band lining pieces in lining fabric (which can be the same as main or different).
Note there are some different possibilities here. You can pick all the same fabric for everything. You can use 3 different fabrics for the bodice, waistband, and skirt. Or you can mix and match with bodice and skirt this same and a constraining waistband. No matter what you choose, this project is fun to personalize.
Make sure you transfer all markings from the pattern pieces! These will be important in construction later on. Note there are two different markings on the adult front bodice piece- triangles and T's. These two markings have different functions so don't be like me and just make a generic line for both or you'll be pulling out your pattern pieces to check which is which!
I like to put all my pieces together in a plastic bag so I don't lose anything and then it's ready to go for tomorrow.
By the end of your cutting session, you should have a pile similar to this. It’s so pretty already!

That’s it for day 2. Tomorrow will be our longest sewing day when we assemble the bodice. But don't worry- you are allowed to catch up on any step until the end of the sew along. Be sure to take a picture of your progress and check in on the Facebook group post to have a chance to win a free pattern from Bella Sunshine Designs and free shipping on one fabric order from Amelia Lane Designs.
Day 3: Today it’s time for the bodice assembly. Start by sewing the main bodice front and back pieces at the shoulders, right sides together. Apply clear elastic in the seams as directed by pattern.
You can do apply clear elastic using your sewing machine, but my favorite method is to use my serger. My serger has this little hole on the regular foot. You can simply thread the elastic through the left-most looper, down through the hole in the foot, and bring it back behind the foot with the thread. Then serge away.


Repeat this same procedure with lining bodice front and back pieces. You will have something similar to this. The front of the bodice is the more triangular shaped piece, designed to overlap. The back bodice has a more squared off shape.

With right sides together, sew one main bodice piece and one lining bodice piece together along the long edge. Do not sew the short edge in back (indicated by scissors). Just to orient us again, the front bodice is at the bottom of the first picture, more triangle in shape. The back bodice is at the top of the first picture. The third picture is how it should look when flipped to right sides out.


Repeat these steps with other bodice pieces.
Open up the bodice so the raw edges of the lining are right sides together and the raw edges of main are together. Align the short back seams. Sew. In this picture, the back of the bodice is the connected portion at the bottom of the picture. The front pieces of the bodice are not yet overlapped and sewn together and are at the top of the photo.

If making the sleeveless version, align armhole of lining to armhole of main. Sew while applying clear elastic with sewing machine or serger. Repeat with opposite side. Turn right sides out. Arrange so lining front and back are together and main front and back are together. Line up underarm seams. Sew. Repeat for other side of bodice. Sorry I have no pictures of these steps, but the illustrations in the pattern should help!
If sewing sleeves, place raw edge of sleeve right sides together with raw edge of bodice. Sew together through main and lining. I always pause here to add a memory hem to my sleeve edge. Fold sleeve up 1/4” and press, then another 1/2” inch and press, but do not sew! Or just fold up 3/4” and press (no sewing!).

Align front and back bodice right sides together on raw edge. Make sure your memory hem is unfolded so it lays flat. Sew through all layers of side seam. Turn bodice right sides out.
Hem sleeves at either 3/8” or 5/8” depending on how much you folded up in earlier step.

Here there are some difference in construction between the kids’ and adult versions:
For kids’ version, match the center front notches and baste through all layers of the front. Don’t sew through back. Bodice should be in a continuous loop and now you are finished for the day!
For adult version, we have one extra step. Baste two rows of stitches (I do one 1/4” away and one 1/2" away from the raw edge) at the bottom of bodice in between the two triangle notches on pattern pieces. Sew through the main and lining of the front bodice, but not the back bodice! Repeat on opposite side.
Gather the basting stitches to match the width of the bodice band. Try to do so equally on both sides so one side isn’t gathered more than the other.
Place left hand side of bodice over right hand side and align the T notches along the bottom. Baste the front bodice through all layers. You will overlap the gathers sewn previously. Your bodice should be in a continuous loop!

And we are done for the day! And also done with the hardest part. Tomorrow we will assemble and attach the bodice band. Be sure to take a picture of your progress and check in on the Facebook group post to have a chance to win a free pattern from Bella Sunshine Designs and free shipping on one fabric order from Amelia Lane Designs.
Day 4: Today we are assembling and attaching the bodice band. The procedure is the same whether you are sewing the kids’ or adult version.
You should have four pieces in total to make the bodice band- two wider main bodice bands and two narrower lining bodice bands.
We’ll start with the main bodice bands. Sew two rows of gathering stitches along each short end of the main bodice bands. Pull the ends of the thread to gather the main bodice band to the width of the lining bodice band. Place the two main bodice bands right sides together and sew along both short sides to make a continuous loop.


Take the lining bodice pieces and place them right sides together. Sew the short ends together on both sides to make a continuous loop. Now you should have two separate bands, one gathered (main) and one not gathered (lining).

Take the main bodice band and align it right sides together with the main bodice piece, aligning raw edges and side seams. Place the lining bodice band right side together with the lining of the bodice, inside the main bodice piece, alleging raw edges and side seams.
Sew around the raw edge, through both bands and both layers of the bodice, while applying clear elastic. You can add the clear elastic with a sewing machine or serger, as explained above. It should look similar to the photo below with the gathered piece on the outside.

Give your bodice a good press in preparation for tomorrow when we attach the skirt and we are done for the day! Be sure to take a picture of your progress and check in on the Facebook group post to have a chance to win a free pattern from Bella Sunshine Designs and free shipping on one fabric order from Amelia Lane Designs.
Day 5: If you have been following along and keeping up every day, this is your last day of sewing! Don’t worry if you’ve fallen behind- you have until Sunday night to repost on every step of the sew-along.
Today we are assembling and attaching the skirt. The skirt can be top, knee, or maxi length depending on your chosen option. Either way, the steps are the same.
First, place the skirt panels right sides together and sew up the side seams.
Next, baste two rows of stitches 1/4” and 1/2” away from the top (smaller) edge. I prefer to do two sections, starting and stopping the stitches on the side seams. It makes it a little easier to gather without breaking thread. Take a second and mark the middle of both skirt panels as well with a pin or marking tool.

Now gently pull the threads to gather the skirt to the width of the bodice. Evenly distribute the gathers between the four sections (side seam to center and center to side seam on both skirt panels). This way you can gather more evenly.

With right sides together, pin the raw edges of the skirt to the bottom of the bodice. Align the side seams and sew through all layers, applying clear elastic in the seam. Press the seam toward the hemline.
Fold the raw edge of the skirt 1/4” to the wrong side and press. Fold another 1” up and press. Or finish edge with serger, cutting off 1/4” and then press hem up 1”. Topstitch along the top fold of hem.
And your Amelia is complete! Share your final photos and check in on the Facebook group post to have a chance to win a free pattern from Bella Sunshine Designs and free shipping on one fabric order from Amelia Lane Designs. If you used fabric from ALD, also post on the wall with #SALWithALD for the chance to win an additional quarterly prize! Thank you for sewing along with me and I hope you love your new Amelia.


Comments