

Sew Along w/ ALD: Mother Grimm Beltaine Fires Tunic
- Shakita Lavon Cook
- Apr 20, 2020
- 7 min read
Updated: Apr 25, 2020
Hey yal, it's Shakita here to host the sew along for the week of April 20, 2020. The pattern of choice is the Beltaine Fires Tunic by Mother Grimm. This will be my first Mother Grimm sew, so I am excited to jump into a new-to-me designer.
I will be updating the blog each day with new steps! Here is our schedule:
4/20: Pattern assembly & choose fabric
4/21: Cut fabric
4/22: Assemble pockets
4/23: Sew pockets to full front
4/24: Sew front & back together
4/25: Sew neckband & hem
4/26: Catch up & share
Follow along here, in the group, or in the event for updates. I hope you will join me and I look forward to seeing all of your makes!
Day 1: Pattern Assembly & Fabric
I chose the Beltaine Fires Tunic for the options! It's a dolman sleeve tunic with options ranging from a plain front/hem to hanky hem! Since Spring is steadily approaching, I thought the Beltaine Fires Tunic would make a nice color blocked "Springy" top.

Today, we will begin by printing and assembling our pattern and choosing fabric. We will also make pattern adjustments, if any.
Refer to the size chart to see what size you would need to make so we can turn off layers of sizes we aren't using. Mother Grimm sizing goes by the names of precious gems, so using measurements is key in figuring out what size to print. This pattern also comes in multiple heights. I will be using the regular height file and grading size Topaz to Tourmaline, as my bust is in the Topaz size, while my waist and hips are off the charts by about an inch. This means that when I print, I will have 2 sizes selected in the layers. We are sewing the Rounded Hem Pockets option, so we will refer to the print chart to save paper. Jot down the page numbers you need and you're ready to print!
Once you have the size determined, check the fabric chart to determine how much fabric is needed for your project. Keep in mind that these measurements are in METRICS. Meters will need to be converted to yards if you are in the US. The Rounded Hem Pockets option needs 2mtrs for the bodice, 1mtr for the pockets, and a fat quarter for the lining of the pockets. I chose Faith as my main fabric and Burgundy Rib Knit for the pockets.

Let's assemble our pattern. Grab your tape or glue, scissors, and your favorite vice!

The pattern isn't trim-less, so we will need to either cut or fold the pages to put them together. I like to fold mine to make assembly a little faster.


Here, I am folding the left edge of the "A1/A3" page in order to tape it to the "A1/A2" page.

Match the diamonds at the edge of the pages up together and tape or glue the pages down. Finish assembly in the same way.
Before cutting the pieces, determine whether you will need to make any adjustments. Since I already know I need to grade 2 sizes, I will leave my bodice uncut and cut the rest of my pieces.
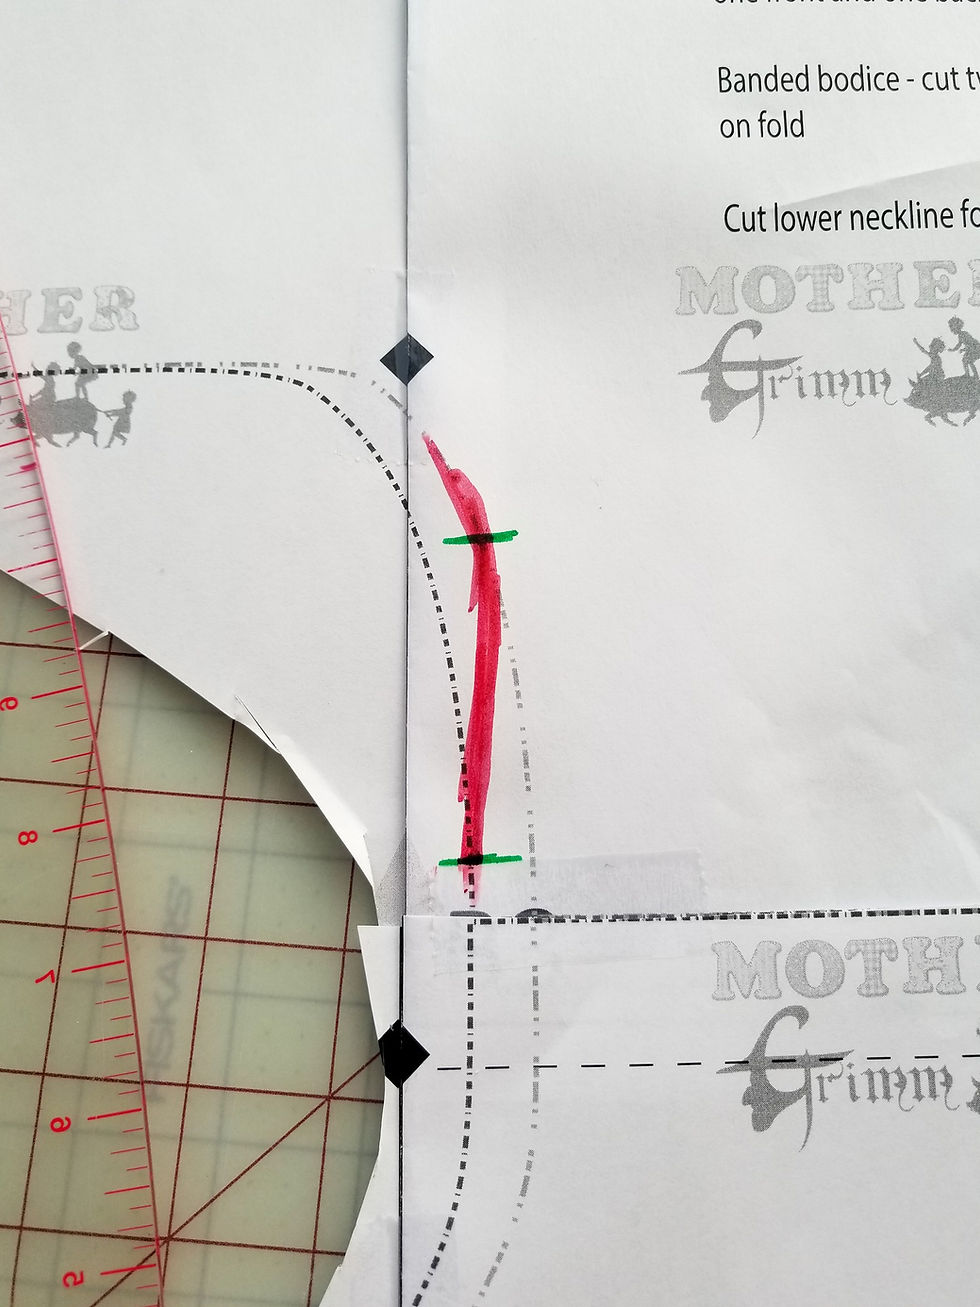
Here is my bodice and the area in which I will grade. I am going to start by marking a bust line and the waist. Then, I will use my ruler to draw a line in order to blend these sizes together.


After I have my blend line, I will smooth the line out with my hip curve.
Now that I've graded my bodice, I can finish cutting the rest of my pattern pieces.

We are officially ready to begin Day 2: Cutting Fabric!
Day 2: Cutting Fabric
Now for a little more action! We are going to cut our fabric pieces out. Since I am making the Rounded Hem Pockets option, I will need to cut the following:
Front
Back
2 back pockets in main fabric
2 front pockets
2 front pocket linings
2 pocket bands
neckband
I am going to begin by cutting my back bodice first since the front and back bodices are the same piece. Fold your fabric in half and cut the back bodice on the fold.

Now, we will need to cut the back neckline off in order to cut our front bodice. The back neckline is indicated by a dotted line; cut along this line, then cut your front bodice.

After you cut your front and back bodice, we will need to cut our mirrored back side pieces from our main fabric.

Using the same pocket piece, we are going to cut the side pieces for the front. I am using my Rib Knit for this section.

Once I cut these pieces, I am going to fold the pocket piece down at the top corner in order to cut the lining of the pocket.


We're almost done cutting! Only 2 pieces left! Next, we will cut our bands. We will need 2 pocket bands and our neckband. This pattern came with a cut chart. I like to make pattern pieces for my neckbands as opposed to measuring and cutting neckbands each time I use a particular pattern.
Here, I have made a pocket band pattern piece in the size notated on the cut chart.

Lastly, we will cut our neck band.

We are done with cutting and we are ready to start Day 3: Pocket Assembly!
Day 3: Pocket Assembly
It's finally time to hop on our machines. Let's grab the pocket pieces and the pocket bands.

We're going to start by folding our pocket bands in half width wise.

Attach the pocket bands to the pocket fronts along the top where we cut our folded pocket pattern piece. The band is a little smaller than the pocket piece, so it will need to be stretched while sewing. I like to clip these bands at the ends since I will have to stretch the band.

Let's take the pocket pieces to our machine. I am using my serger for this part, but this can also be completed using a stretch stitch on a sewing machine.

After you attach the bands to the front pocket pieces, we will need to press (steam) the seam to flatten out any waviness and press the seam allowance down. Then we will topstitch the seam with a stretch stitch. Depending on the fabric, be careful with the stitch you choose. I chose a honeycomb stitch, but selected too small of a stitch for the fabric with which I am using. This caused additional waviness once I topstitched. I pressed the seam as long as I could to get it as flat as possible.

Now, we will clip our pocket fronts to our pocket linings. Place the pocket front wrong side to the right side of the pocket lining, ensuring that the rounded edges are lined up if you are making the rounded hem version. The pocket bands are going to hang off the ends of our pockets. They will be snipped after the pocket front is basted to the pocket lining.

Using the longest straight stitch -don't backstitch, baste both the pocket fronts to the pocket linings.

Once we snip the ends of the pocket bands, we're done! See you all tomorrow for Day 4: Sewing Pockets to Front & Side Pieces to Back

Day 4: Attaching Pockets & Side Pieces
Today's task will be a short one. We will attach our pockets to our front bodice and the side pieces to our back bodice. Grab your pieces and clips or pins and let's get started!
Place your front bodice right sides up.

Lay one of your pocket pieces on top of the front bodice lining up like edges; clip together and repeat with other side and back bodice.


I'm going to take these pieces to my serger and sew them together. After sewing, the seams will be wavy, so we will need to press them and iron the seam toward the bodice.


Now, we will topstitch the pocket and back bodice side seam up toward the bodice.

The seams will be wavy, so we will need to press them flat. Once pressing is done, we are ready to move on to Day 5: Sewing Front Bodice to Back Bodice!

Day 5: Attaching Front Bodice to Back Bodice
Welcome to Day 5! Today, we'll be attaching our front bodice to our back bodice. It's going to be pretty quick, so let's jump right in!
Grab your front and back bodice.

Place one bodice on top of the other, with right sides together. I am starting with my shoulders first. If you would like to clip/pin the seams you can.

After matching the shoulder seams up, I am going to match up my side seams. I won't be clipping or pinning, but I am going to use a little wonder tape where the pocket and back side pieces line up. I don't want these seams to shift while sewing, so the wonder tape is going to help keep them still.


Now, sew your front and back together. Once complete, we are ready for Day 6: Neckband & Hemming!!


Couldn't resist a little sneak peek!
Day 6: Neckband & Hemming
Welcome to Day 6! It's our last day of active sewing. Today, we will attach our neckband to our tunic and hem. I am going to grab my tunic and my neckband.

Next, I am going to fold my neckband in half length wise and take it to my serger to sew closed.

After sewing the neckband closed, I will fold the neck band in half width wise so my wrong sides are touching each other and press it.

In order to attach the neckband, I am going to split the band and the neck line of the tunic into quarters.

With my tunic right site out, I will match up my neckband quarter markings with my neck line quarter markings. Ensure that the raw edges of the neckband and neck line are touching and the seam of the neckband is touching the middle of the back neck line.

I am going to sew the neckband down by stretching the neckband between each quarter marking.

After the neckband is attached, I am going to finish the raw edges of my sleeves and hem.


Before hemming, I am going to hide my serger tails and trim them. I use an embroidery needle with a large eye.


Now, we've reached the final task: hemming! You can also top stitch your neckband at this point as well. I am lazy, so I will iron mine and keep it moving. I am also a lazy hemmer, so I will be eyeballing my hem and using the ruler on my machine as opposed to clipping/pinning. Turn the tunic inside out and fold the sleeve edges up. I like 1/2in hems, so that's the measurement I'll use. I will finish my hem in the same way.

Now, we're done!


I can't wait to see all of your makes! We will be devoting tomorrow to catching up, so you will still have a chance to enter the drawing if you need a little time. Thanks for joining our SAL!


Comments